DeinoMPI
The Great and Terrible implementation of MPI-2
DeinoMPI
Compiler Support
Deino Software © 2009
Contents
Portland Group Fortran Win64 compiler
Introduction
DeinoMPI is an implementation of the MPI-2 standard for Microsoft Windows originally derived from the MPICH2 distribution from Argonne National Laboratory.
System requirements:
Windows 2000/XP/Server/Vista/7
.NET Framework 2.0
This document explains how to compile and debug applications for DeinoMPI with examples from various compilers.
Compiling Applications
Compile your MPI applications using the following information. Set your include path to include the DeinoMPI\include directory. Set your library path to include the DeinoMPI\lib directory. Link your C applications with mpi.lib from the lib directory. Link C++ applications with the cxx.lib and mpi.lib libraries. Link Fortran applications with DeinoFMPI.lib.
There are several versions of the Fortran link libraries to support common name mangling and calling conventions used by various Fortran compilers. The following libraries contain the specified formats:
· DeinoFMPI.lib – MPI_INIT and mpi_init_. All capital external names and all lower case external names with a trailing underscore. Functions use the C calling convention. There is a Unicode version of this library also – DeinoFMPIu.lib. The Intel compiler uses this format as of the 8.x series. The Portland Group compiler uses the lower case format.
· DeinoFMPIs.lib – MPI_INIT@4. All capital external names. Functions use the stdcall calling convention. Visual Fortran 6.x uses this format.
· DeinoFMPIg.lib – mpi_init__. All lower case external names with two trailing underscores. Functions use the C calling convention. g77 uses this format.
Debugging Applications
Debugging parallel applications is hard but there are a few options provided by DeinoMPI that can help.
1) This simplest and sometimes most effective way to debug MPI applications is to add printf statements to your code. Whenever you add a printf statement, make sure to add a call to fflush(stdout); after the printf statement or statements. It is important to do so because the output of applications is buffered by default and must be flushed if you want to see the output immediately. This is true for stderr also because unlike on UNIX systems stderr is buffered on Windows machines.
2) The DeinoMPIwin.exe GUI tool has a Show Messages button that can provide useful information.
First, the Show Messages button will display the current state of the internal MPI message queues. This can be useful if your application hangs and you are not sure why. You can click the Show Messages button and see what messages are in the internal message queues for each process. Two message types can show up. There can be posted messages where a process is expecting a message but has not received it yet. And there can be messages that have been received and buffered but not matched yet. Note: some messages may not correspond directly to user code MPI calls since the implementation uses internal messages to implement the collective, file and win MPI functions. But it is easy to understand these messages because they are marked with type information.
Second, the Show Messages button will display the MPI function call history for each process if you have specified the DeinoMPI_USE_CALL_HISTORY environment variable. With this option turned on each MPI function call is logged to an internal ring buffer. When you click the Show Messages button the last N calls will be printed out for each process. The default is to save 32 calls per process but this can be reduced using the environment variable, DeinoMPI _CALL_HISTORY_SIZE. Set this value to a number between 1 and 32 to limit the depth of MPI calls per process saved.
3) Jumpshot is a java tool that can be used to profile applications. It is limited in its debugging ability though because applications must run to completion in order to generate log files. The primary goal of Jumpshot is to view the runtime patterns of an MPI application and then analyze these patterns to see if changes can be made to the code to optimize the application. Jumpshot has very well developed tool options for this kind of work. See the Jumpshot manual for information.
Using a debugger
There are at least two ways you can use a debugger to step through your parallel processes. These methods have been tested using the Visual Studio debugger but may also work with other debuggers.
1) Use a debugger to attach to the running processes. If your application has a natural wait state then you can simply attach the debugger when the processes are idle. Otherwise you can add code to the beginning of your application to cause it to wait. For example: you could create a local variable, set it to true and add a while (local_variable) { Sleep(100); } statement. When you start the application using mpiexec.exe all the processes will be stuck in this infinite loop. Use the debugger to attach to the processes and set the local_variable value to false. Then you will be able to step through the process. You could also make this Sleep block depend on a command line parameter so that you can attach to a specific process instead of all of the processes. Depending on the user privileges you may get Access Denied errors when trying to attach to processes started by mpiexec.exe because the processes are started by the DeinoPM service. If this is the case you can use the –localonly flag to start the processes: “mpiexec.exe -localonly …”. This will start the processes directly from the current user’s environment.
2) A second method is to start each process by hand. You will set up the environment for each process and start the debugger for each process. In order to debug processes directly without attaching to running processes you will need to set up the environment variables for each process. You can set the environment variables, start the debugger and then step through the process. When you start a job this way the dynamic process functions like MPI_Comm_spawn will not be available. The smallest set of variables required to be set are: PMI_ROOT_HOST, PMI_ROOT_PORT, PMI_ROOT_LOCAL, PMI_RANK, PMI_SIZE, PMI_KVS, PMI_WDLL_NAME. Here is a batch file that can be run to set the variables for each process:
· if "%1" == "" goto HELP
· if "%2" == "" goto HELP
· set PMI_ROOT_HOST=%COMPUTERNAME%
· set PMI_ROOT_PORT=9222
· set PMI_ROOT_LOCAL=1
· set PMI_RANK=%1
· set PMI_SIZE=%2
· set PMI_KVS=deinompi
· set PMI_WDLL_NAME=none
· goto DONE
· :HELP
· REM usage: setmpi2 rank size
· :DONE
Save this text as setmpi2.bat and then use it as follows. Bring up a command prompt for each process in the job. Let’s assume you are starting a two process job. Bring up two command prompts and execute the following in the first one: “setmpi2.bat 0 2”. Then execute this in the second one: “setmpi2.bat 1 2”. The first prompt will be rank 0 in a job of size 2. The second prompt will be rank 1 of size 2. Then from the each command prompt execute: “devenv.exe myapp.exe”. Substitute the name of your application for myapp.exe. Devenv.exe is probably located at C:\Program Files\Microsoft Visual Studio 8\Common7\IDE\devenv.exe. At this point you will have two debuggers open. Now you can step through each process independently using the two debugger windows. There is one requirement to stepping through the processes. You must step over MPI_Init in the root process, process 0, first before calling MPI_Init from the other processes. Also you can restart the processes from within the debuggers but you have to restart all of them and make sure process 0 calls MPI_Init first.
The setmpi2.bat script assumes that the job will run on a single host. If you want to run on multiple machines you will need to change the PMI_ROOT_HOST environment variable to be the name of the host where process 0 is started. For example: on the second host you could execute “setmpi2.bat 1 2” and then “set PMI_ROOT_HOST=first_host_name”.
Compiler support
This section describes in detail how to compile MPI applications for DeinoMPI using various compilers.
Developer Studio .NET 2003
For Developer Studio .NET 2003 or newer you can use the example projects provided in the examples directory as a guide to creating your own projects.
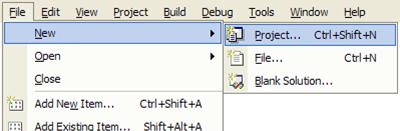
Create a project and add your source files. It is recommended that you select a command line application but if you choose a GUI application you should make sure it can run unattended and that only the root process creates windows.
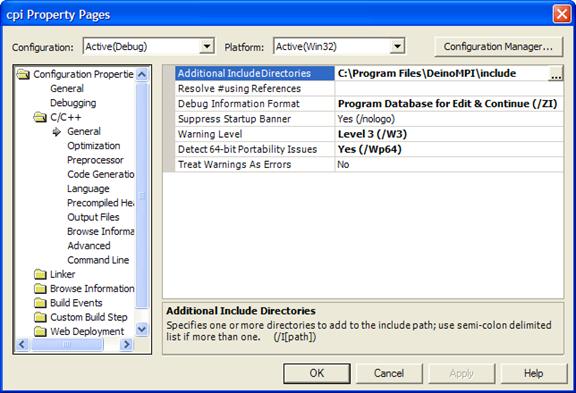
Bring up the properties dialog for your project by right clicking the project name and selecting Properties.- Navigate to Configuration Properties::C/C++::General
- Add C:\Program Files\DeinoMPI\include to the “Additional
Include Directories” box.
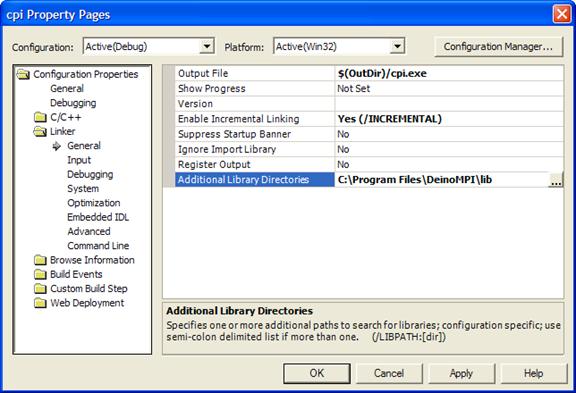
- Navigate to Configuration Properties::Linker::General
- Add C:\Program Files\DeinoMPI\lib to the “Aditional
Library Directories” box.
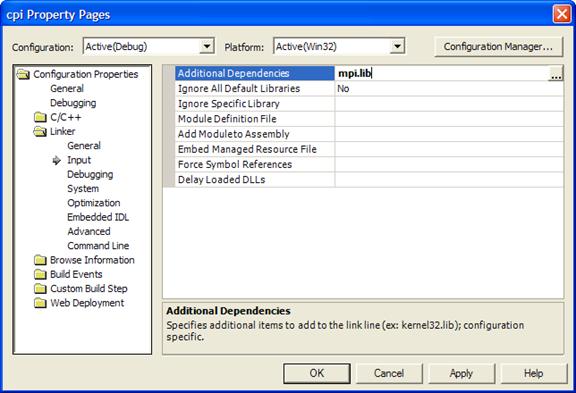
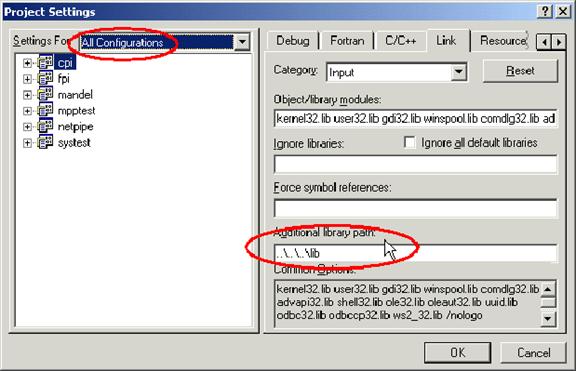
- Navigate to Configuration Properties::Linker::Input
- Add cxx.lib and mpi.lib and DeinoFMPI2.lib to the “Additional Dependencies” box. If your application is a C application then it only needs mpi.lib. If it is a C++ application then it needs both cxx.lib and mpi.lib. If it is a Fortran application then it only needs one of the DeinoFMPI[s,g].lib libraries. The fortran library comes in several flavors namely DeinoFMPI.lib, DeinoFMPIu.lib, DeinoFMPIs.lib and DeinoFMPIg.lib. Add the library that matches your Fortran compiler.
- DeinoFMPI.lib contains two sets of symbols. One set is all uppercase symbols and the other is all lowercase with one trailing underscore. Both interfaces use the C calling convention. The symbols look like this: MPI_INIT or mpi_init_. The Intel compiler uses this format as of the 8.x series. The Portland Group compiler uses the lower case format.
- DeinoFMPIu.lib is a Unicode version of DeinoFMPI.lib
- DeinoFMPIs.lib contains all uppercase symbols and uses the stdcall calling convention like this: MPI_INIT@4. Visual Fortran 6.x uses this format and so does the Intel compiler when combined with the –cvf flag.
- DeinoFMPIg.lib contains all lowercase symbols with double
underscores and the C calling convention like this: mpi_init__. g77 uses
this format.
- Compile your application.
Developer Studio 2005/8
For creating C/C++ MPI applications using Developer Studio 2005 or 2008 the instructions are the same as in the section for Developer Studio .NET 2003. The dialog boxes are identical for setting the include and library paths. There are a couple things to note if you choose to create a console application using the default wizard settings. The wizard creates an application using UNICODE and pre-compiled headers. You will need to add “include <mpi.h>” to the generated stdafx.h file instead of your source file otherwise you will get unresolved symbol errors. Also the include of mpi.h must go before stdio.h because of the known conflict between the MPI standard and the standard include files.
Intel C
The Intel compiler can be integrated into Developer Studio .NET 2003 and it accepts the same command line arguments as the Microsoft Visual C/C++ compiler. So if you have the Intel compiler integrated into the developer studio suite then you can follow the instructions from the Developer Studio section to create DeinoMPI applications.
Intel Fortran
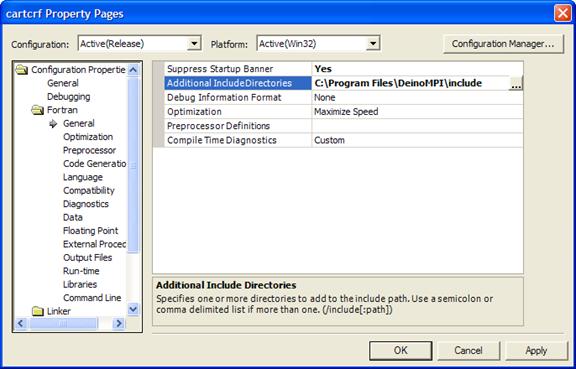
The Intel compiler can be integrated into Developer Studio. So if you have the Intel compiler integrated into the developer studio suite then you can follow the instructions from the Developer Studio section to create DeinoMPI applications. Set up the include and library directories as described in the Developer Studio section. For the default Intel Fortran settings use DeinoFMPI.lib in the link dialog. If you use the –cvf option then link with the DeinoFMPIs.lib library. The one difference between the instructions for Visual Studio C/C++ applications and Intel Fortran applications is the location of the include directory setting. For Fortran applications it is located under the fortran::general folder:
Visual Studio 6.0
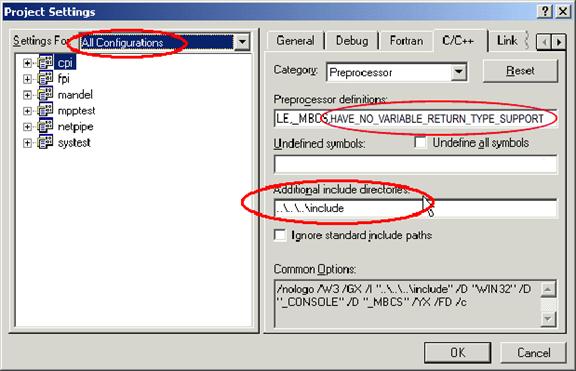
Visual C++ 6.0 cannot handle multiple functions with the same type signature that only differ in their return type. So you must define HAVE_NO_VARIABLE_RETURN_TYPE_SUPPORT in your project.
- Create a project and add your source files.

- Bring up the settings for the project by hitting Alt F7.
Select the Preprocessor Category from the C/C++ tab. Enter
HAVE_NO_VARIABLE_RETURN_TYPE_SUPPORT into the Preprocessor box. Enter
C:\Program Files\DeinoMPI\include into the “Additional include
directories” box.
- Select the Input Category from the Link tab. Add cxx.lib
and mpi.lib to the Object/library modules box. Add C:\Program
Files\DeinoMPI\lib to the “Additional library path” box.
- Change the settings to use the thread safe libraries
- Compile your application.
Cygwin
http://www.cygwin.com.
Cygwin users can use gcc and g77 to compile DeinoMPI applications. Link C
applications with mpi.lib and Fortran applications with DeinoFMPIg.lib. In
order to run your application you must have the cygwin dll in the system path
or in the same location as your executable. Otherwise the application will not
load. This is important because the process manager does not use the user path
so even though you can run your application as a single process within the bash
shell it will fail when you try to run it with mpiexec. Either copy
cygwin1.dll to the Windows system32 directory or put it in the same location as
your executable.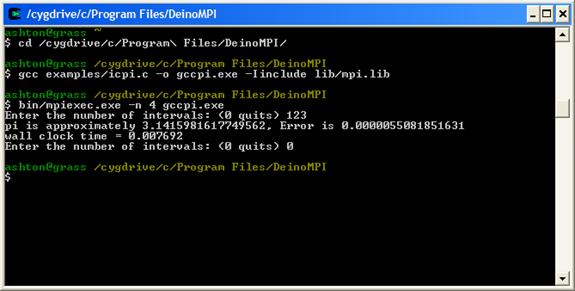
The C++ interface to MPI is not available under cygwin because g++ does not create the same symbols as Visual C++ which was used to create the C++ library cxx.lib.
MINGW
The Minimalist GNU for Windows environment allows you to create applications that do not depend on any dynamic libraries other than the Windows system libraries. This is an advantage over the cygwin environment because in order to get your cygwin DeinoMPI application to run you have to copy the cygwin1.dll to all your nodes. MINGW applications do not depend on any companion dlls.
In order to test DeinoMPI under MINGW the project files were downloaded from SourceForge: http://sourceforge.net/projects/mingw. It is recommended that you download the latest version but the names of the packages used to test DeinoMPI are provided here for reference.
- binutils-2.16.91-20060119-1.tar.gz
- gcc-core-3.4.2-20040916-1.tar.gz
- gcc-g77-3.4.2-20040916-1.tar.gz
- mingw32-make-3.81-1.tar.gz
- mingw-runtime-3.10.tar.gz
- mingw-utils-0.3.tar.gz
- w32api-3.7.tar.gz
- MSYS-1.0.10.exe
On the test machine all the files were unzipped to
C:\bin\mingw. After unzipping the MINGW files MSYS was installed and pointed
to C:\bin\mingw. From within the MSYS shell the example cpi application was
compiled and run using mpiexec: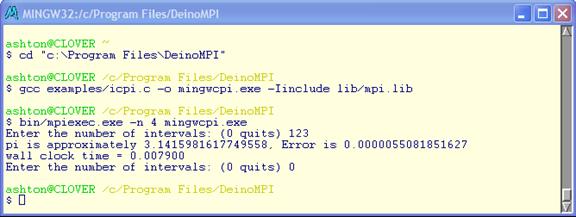
Watcom
The C compiler from OpenWatcom was tested. Version 1.5 was downloaded from http://www.openwatcom.org. The sample cpi program was compiled from the command line. Bring up a command prompt and set the environment variables defined in CHANGES.ENV in the root Watcom directory. Change to the DeinoMPI directory and execute the following command:
wcl386 –bm –l=nt –i=include examples\icpi.c lib\mpi.lib
Then execute the example using mpiexec.
Tiny C Compiler
This compiler almost worked. Version 0.9.23 was downloaded from http://fabrice.bellard.free.fr/tcc. tcc doesn’t understand the dll macros so mpi.h had to be modified to remove those definitions by simply defining them to nothing:
#define MPI_CALL
#define MPI_DLL_SPEC
Then it complained about the extern declarations so these two lines had to be removed:
extern MPI_DLL_SPEC MPI_Fint * MPI_F_STATUS_IGNORE;
extern MPI_DLL_SPEC MPI_Fint * MPI_F_STATUSES_IGNORE;
In order to link with the MPI library an export file had to be created. The file deinompi.def was created by executing this command:
c:\tcc-0.9.23\tcc\tiny_impdef.exe c:\windows\system32\DeinoMPImpi.dll
Then the cpi example was compiled using this command:
c:\tcc-0.9.23\tcc\tcc.exe –o tccpi.exe –DUSE_GCC –Iinclude –Ic:\tcc-0.9.23\include examples\icpi.c deinompi.def c:\tcc-0.9.23\lib\msvcrt.def
The code compiled but link failed with an unresolved symbol “_start”.
Borland C
The Borland C/C++ compiler command line tools version 5.5 package was downloaded from http://www.borland.com/downloads/download_cbuilder.html (If the link has changed then you can always start at the root website and navigate from there http://www.borland.com). The compiler was installed in the default location and the configuration files were created in accordance with the readme.txt file. There was a mistake in the readme in that the configuration files need to be place in the bin directory and not the root directory. The Borland compiler doesn’t know how to read the Microsoft import library format so an import library needed to be created before any DeinoMPI applications could be compiled. This command created the import library:
c:\Borland\bcc55\bin\implib –a mpi.borland.lib c:\Windows\system32\DeinoMPImpi.dll
Then you can compile the example cpi application from a command prompt with this command:
bcc32 –Iinclude examples\icpi.c mpi.borland.lib
Digital Mars
The Digital Mars C/C++ compiler version 8.48 was downloaded from http://www.digitalmars.com. The C/C++ compiler (dm848c.zip) and Basic Utilities (bup.zip) packages were unzipped to C:\bin and a dm subdirectory was created by doing so. Then the icpi sample application was created from a command prompt. The Digital Mars C compiler cannot read the mpi.lib import library so a new one was created from DeinoMPImpi.dll before the sample application could be compiled. Here is the command to create an import library called mpi_dm.lib:
c:\bin\dm\bin\implib.exe /s mpi_dm.lib c:\Windows\system32\DeinoMPImpi.dll
With the import library created icpi could be compiled with the following command:
c:\bin\dm\bin\cl.exe /Iinclude examples\icpi.c mpi_dm.lib
Lcc-win32
The lcc-win32 compiler package version 4.0 July 30, 2006 was downloaded from http://www.cs.virginia.edu/~lcc-win32. It was installed in the default location C:\lcc. The compiler cannot link with the DeinoMPI import library, mpi.lib, so a new one was created using the tools provided. Creating the import library took two steps:
pedump /EXP lib\mpi.lib > mpi.lcc.exp
buildlib mpi.lcc.exp mpi.lcc.lib
Once the import library was created then the sample application could be compiled:
lc –Iinclude examples\icpi.c mpi.lcc.lib
Pelles C
The Pelles C compiler can be found in various places, http://www.smorgasbordet.com/pellesc or http://www.christian-heffner.de. If either of these mirrors is not available just search the web for “Pelles C for Windows”. Version 4.0 was installed to the default location. Compiling is straightforward if the cc compiler driver is used. Here is the command line used to compile icpi.c from a command prompt after changing into the C:\Program Files\DeinoMPI directory:
C:\Program Files\PellesC\bin\cc.exe /Ze –Iinclude examples\icpi.c lib\mpi.lib
The /Ze option tells the compiler to use the Microsoft extensions to C.
Salford FTN95
The single user evaluation package of the Salford Fortran95 compiler version 4.9 was downloaded from http://www.silverfrost.com. The package was installed to the default location and then the redistributable dlls were copied to the Windows system32 directory. This is required because executables generated by FTN95 depend on these dlls and they must be available to the process manager that starts the MPI job. These dlls were found in C:\Program Files\Salford Software\FTN95\redist\*.dll. They need to be copied to all the nodes that will participate in the MPI job or they need to be copied to the same location as the MPI application.
The example fpi application was compiled from the command line. First an FTN95 command prompt was brought up from the Start menu link installed with the package. After changing into the DeinoMPI directory the following two commands were issued to compile the sample application:
ftn95 /INCLUDE include examples\fpi.f
slink examples\fpi.obj c:\Windows\system32\DeinoFMPI.dll
The slink tool creates an import
library directly from the Fortran dll from the DeinoMPI distribution. We were
not able to get the compiler to link with the import libraries provided with
DeinoMPI.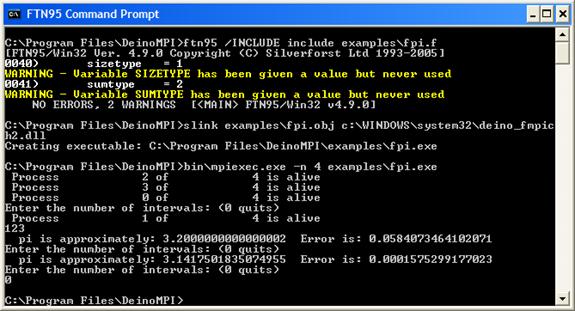
Absoft Fortran
The Absoft Fortran compiler is compatible with the DeinoMPI libraries. The Absoft compiler generates all uppercase external symbols using the C calling convention by default so link with DeinoFMPI.lib.
Portland Group Fortran Win64 compiler
The Portland Group Fortran compiler for Windows was tested on a Windows Server 2003 x64 machine. You can compile and link with DeinoFMPI.lib. To compile the sample fpi application first a PGI Command Prompt (64) was opened using the start menu shortcut under the PGI Workstation tools menu. After changing into the DeinoMPI directory the following command compiled the fpi.f sample application:
pgf95 –Iinclude examples\fpi.f lib\DeinoFMPI.lib
The pgf95 compiler creates a dependency on pg.dll so you have to copy this dll to the system directory of all the machines or put it in the same location as your MPI application before you can start a job with mpiexec.
Dev-C++
The Dev-C++ IDE version 4.9.9.2 was downloaded from http://www.bloodshed.net/devcpp.html. A sample MPI application was compiled by adding the following settings: Add C:\Program Files\DeinoMPI\include to the includes variable. Add C:\Program Files\DeinoMPI\lib to the library variable. Add C:\Program Files\DeinoMPI\lib\mpi.lib to the linker command. Compile the application and run it with mpiexec. C++ applications cannot be compiled because Dev-C++ is just a wrapper over gcc/g++ which is not able to link with the MPI C++ interface in cxx.lib.
Other compilers
If you are using a compiler that cannot link with the Microsoft format mpi.lib or any of the other libraries in the package then you will need to read the documentation for your compiler to find out how to link with existing dlls. You will need to be able to create an import library for DeinoMPImpi.dll. Most compilers provide tools to strip the export table from existing dlls and then create import libraries from this information. If you are successful in this method please send information on how you did it to [email protected] so it can be added to the web site.